


Every initiative in Marketing Cloud Account Engagement (Pardot) ultimately shares the same goal of nurturing prospects through the sales funnel, from creation to Opportunity Won—and beyond!
To build a database of prospects eligible for nurturing, marketers engage in various methods of lead generation, some that are built within Pardot (landing pages, for example) and some that take place outside of Pardot (like meeting new leads in-person at a tradeshow).
However a lead is generated, they must be created as a prospect in your Pardot account before they can be nurtured down the funnel. While creating prospects in Pardot seems like a pretty straightforward task, doing so improperly can create a cascade of issues. If these issues result in sync errors within your Salesforce connector, it can impact your ability to assign and hand off sales qualified leads.
While issues and sync errors can occur with any method of lead generation, they’re most commonly the result of manual imports. External data, of course, has no direct relationship with or visibility into accepted picklist values or required fields and therefore cannot trigger any warnings or clues about a potentially-problematic format.
The responsibility falls to the user to ensure the imported prospect data is standardized and meets org-wide expectations (both at the moment the prospect is created, and down the road when that same prospect is ready to be synced to Salesforce as a lead). Don’t be fooled by appearances—this is not a simple task.
What is a Pardot import template, and how will it help?
If you’re thinking, “there must be a better way,” you’re absolutely right. When manually importing prospects into Pardot, using an import template is the key to an easy-to-follow (and errorless) process.
Thankfully, import templates are fairly unsophisticated. In most cases, an import template is nothing more than a spreadsheet made up of pre-defined fields and values that guides a user in readying a file for import.
Along with ensuring that imported prospect data can be easily segmented and leveraged for marketing efforts, import templates also help to prevent two types of critical errors.
Pardot Import Errors
These are upfront errors that result from bad or invalid data in a source CSV file, preventing the creation of prospects altogether.
A common example of a source-file-related import error is one that references a date field.
Most spreadsheet tools auto-update a date field to the dd/mm/yyyy (or mm/dd/yyyy) format, making it easier for users to read. In Pardot, however, this format (and any related prospects) will be rejected, as Pardot expects dates in the YYYY-MM-DD format.
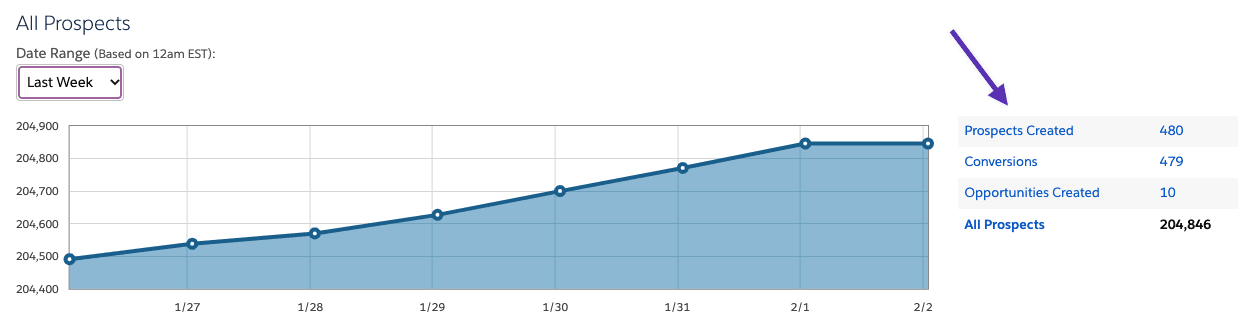
Always monitor your Pardot import log after completing the upload process—even when you’ve used an import template—as fields, values, and requirements can be updated at any time in Salesforce and/or Pardot. The import log keeps track of how many prospects have been created, updated, or resulted in errors.
Frustratingly, Pardot sends the same generic “Pardot: Import Successful” email after every import, even imports that result in nothing but errors.
(If you open the email, it will list the total number of errors with a link to a CSV file containing the errors and reasons, but it’s easy to miss this.)
Pardot Sync Errors
While import errors are frustrating, sync errors are especially insidious. Here’s why:
- Sync errors are usually not immediately evident, as most Pardot users do not assign net-new prospects right away; rather, they wait for these prospects to reach a qualification or engagement threshold to indicate their sales-readiness.
- Pardot users do not receive email or system alerts about sync errors; in order to be alerted to their existence, you have to know where to look. Pardot Admins should enforce monitoring for sync errors, making it a weekly, monthly, or even daily task (depending on your organization’s history with sync errors or how many you’re actively trying to resolve).
- Sync errors occur at the worst possible moment in a prospect’s lifecycle: the moment they’re determined to be qualified for sales. If the sync error goes undetected (frightfully common), this can result in an engaged, sales-ready prospect simply sitting in limbo, unassigned. This type of missed opportunity is difficult to stomach, as qualifying and assigning a qualified lead is the end goal most marketers are trying to achieve.

To resolve existing sync errors in your account, see this article on troubleshooting and resolution.
Creating a Pardot import template
To build a template that works—for everyone—start by learning about the way your business handles data and why. Different departments will have individual data needs and expectations. If you’re in a marketing role, take the time to understand the needs of your sales team (including how they leverage data to do their job).
If you’ve been tasked with creating an import template for your organization, make sure you’re familiar with its unique set of custom fields, field values, and lead object requirements.
Document needed fields
Armed with a new understanding of your company’s data needs, begin the import template creation process by examining some of your past imports and the fields they included. While you might not include all these fields in your template, past imports should give you some general ideas about the types of source files your team will process in the future.
Most import templates will include—at a minimum—the following fields:
- First Name
- Last Name
- Job Title
- Company
- Phone
- Lead Status
- Source
- Address One
- Address Two
- State
- Country
- Zip/Postal Code
- Industry
- Campaign ID (optional, see below)
We suggest that you name column headings in your import template with the same name as their corresponding Pardot field; if you do this, these fields will automatically be mapped during the import process. If you have different names for your column headings than you do for your Pardot fields, you will create more work yourself by needing to map each individual field.
Define field attributes
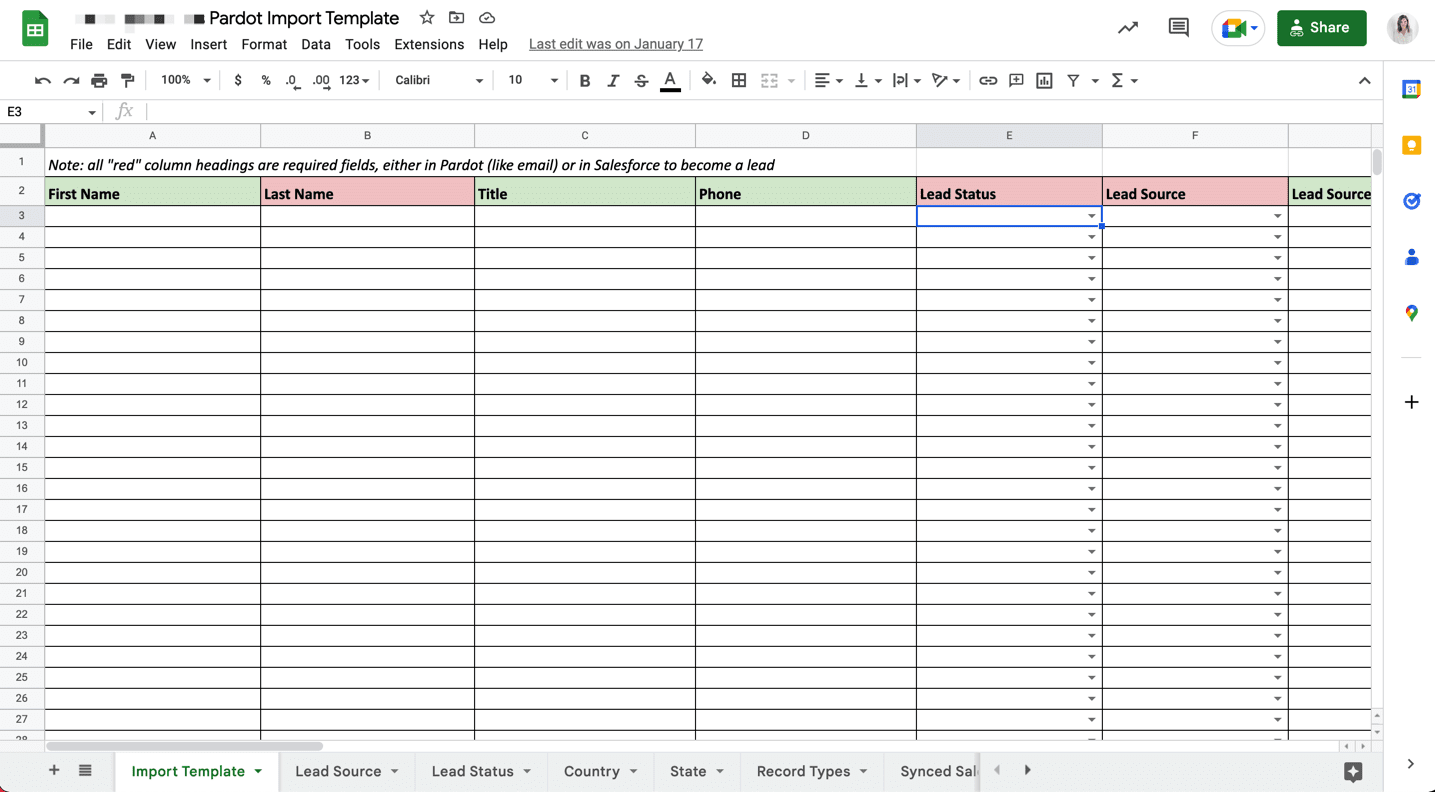
Including fields in your import template does not require that those fields are always populated; rather, it provides the opportunity to populate them when applicable and to do so properly. To mark the fields that always need to be populated, in every import (such as lead source), highlight the relevant column headings.
When we build import templates for clients, we highlight required fields in red, noting that the requirement may be related to Pardot (like the email field) or for efficient processing in Salesforce (such as a lead record type field).
In the end, there’s no great need for this distinction between Pardot and Salesforce requirements; all prospects in Pardot should be created with Salesforce lead assignment and conversion in mind.
Next, review the field types for each field you’ve included in your template.
Generally speaking, text fields do not need special treatment. Even so, you should still review each one—especially if it’s a field that has caused sync errors in the past—for potential problems, including field length restrictions.
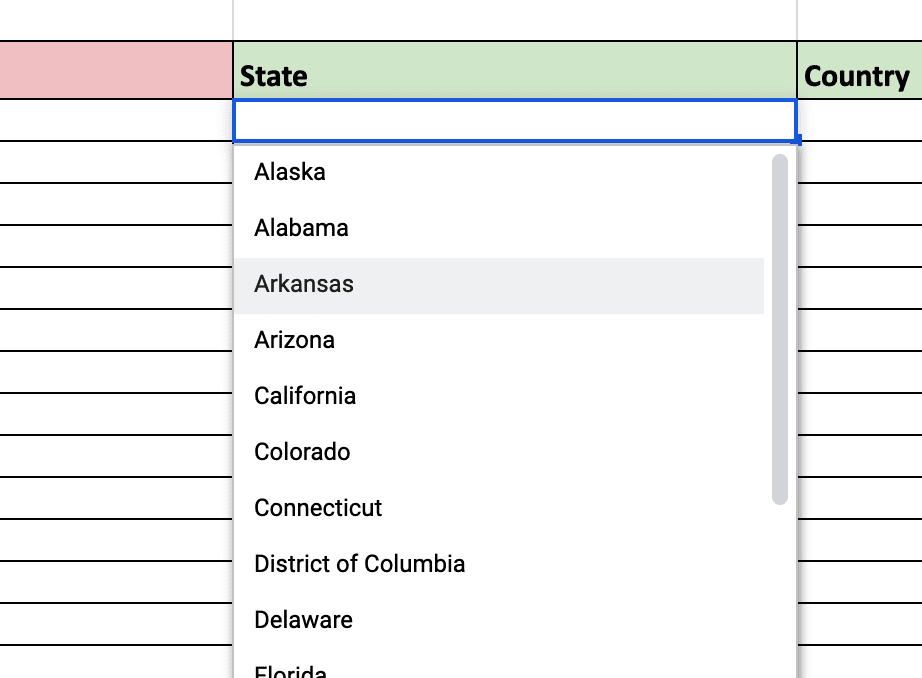
This is also a convenient time to evaluate whether some of your current text fields make sense as text fields. Out of the box, fields like country and state in Salesforce are text fields. You can change this in Salesforce by configuring State and Country/Territory picklists (definitely a best practice), but making this update in Salesforce doesn’t translate to Pardot on its own; you will still need to update the field type and values for your State and Country fields in Pardot as well.
Each picklist field will need data validation rules so that users can easily see the values that are allowed and/or the expected format.
Additional column options and considerations
Along with the fields needed for a minimally viable import template (primarily prospect attributes), consider any actions that might need to occur upon import. Some common scenarios include:
- Assignment: If your new prospects are already sales qualified (perhaps they viewed a demo at a tradeshow booth), you can assign them during the upload process by adding a “Lead Owner” column to your source CSV file. Pardot accepts owner assignments in the format of an email address, so you can also create data validation rules for this field, including only the email addresses of sales users fit for lead assignment.
- Score adjustment: If your new prospect has already shown a high level of engagement outside Pardot, it might not feel right to start them off with a score of 0. You can adjust a prospect’s score upon import by including an “Add to Score” column and populating it with the number of points you’d like to add (e.g., 25).
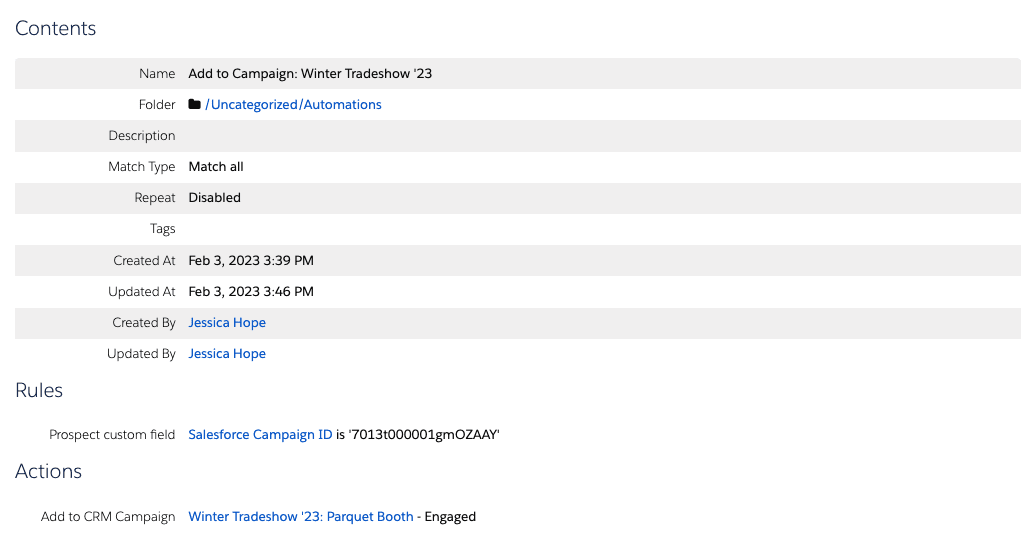
- Campaign ID: If you want to easily add your prospects to a Salesforce campaign after import, it can help to include a column where users can add a Salesforce campaign ID. By creating this as a custom field in Pardot and making it available for imports, your team can reference this field in an automation or segmentation rule to quickly add prospects to Salesforce campaigns as members. You do not need to try and sync this custom field to a field in Salesforce, as it serves only an internal purpose in Pardot.
Importing your new file
With our prep work completed, we can begin the process of importing prospects into our Pardot instance.
However you choose to utilize your new template in Excel (or Google Sheets, or wherever you’ve built it), remember that in order to import into Pardot, you’ll need the final, import-ready version to be in the form of a CSV file.
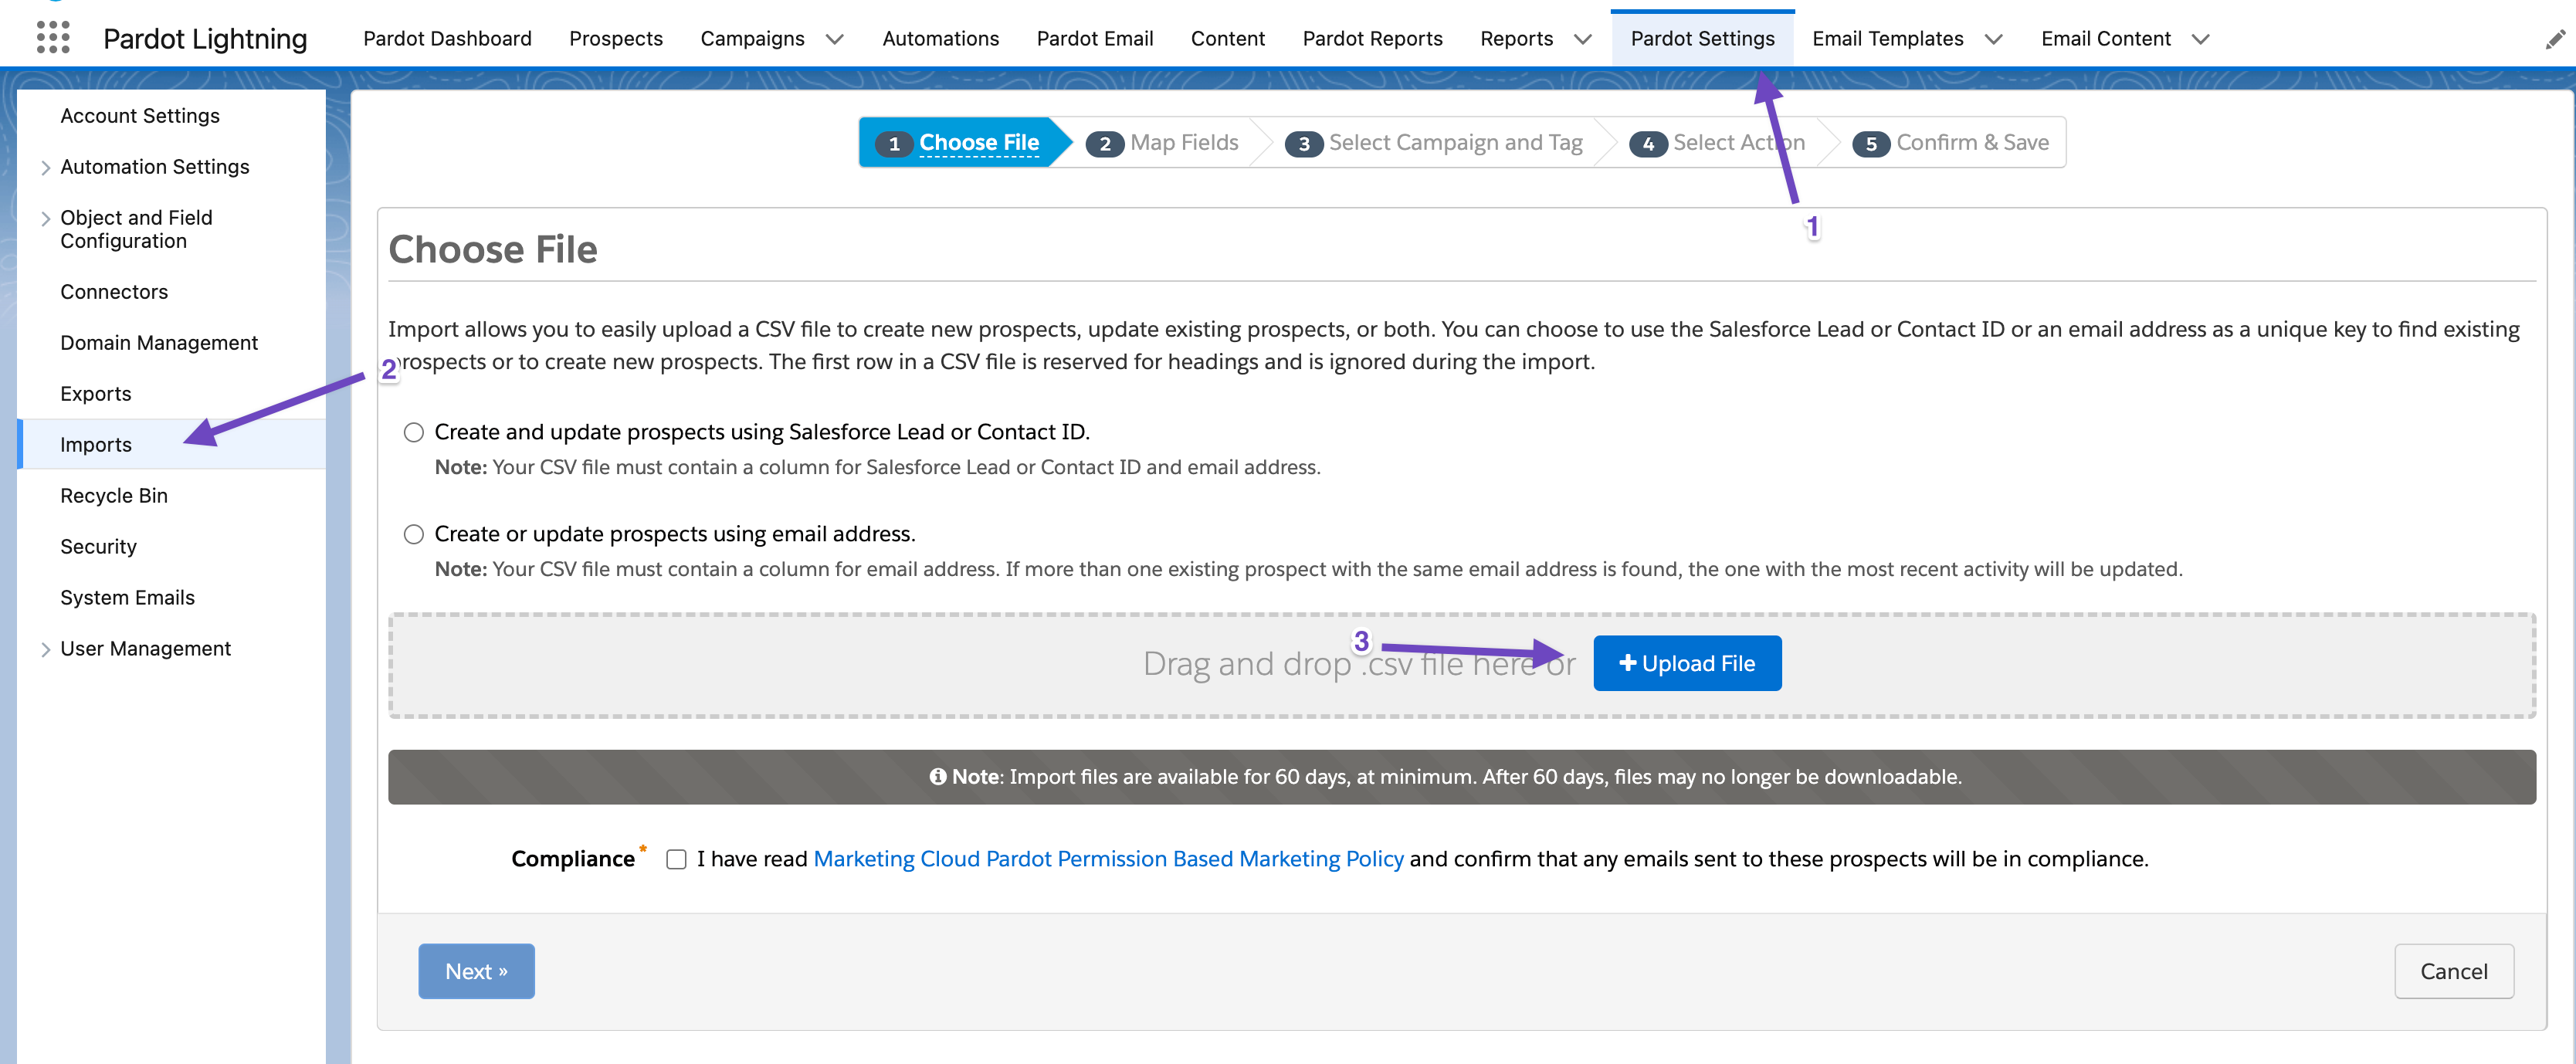
1. Choose your file
Once you’ve reviewed this file and you’re ready to upload the new prospects into Pardot, navigate to Pardot Settings > Imports. Select the option most appropriate for your file (in this scenario, it will likely be the ‘Create or update prospects using email address’ option), and click the button that reads ‘Upload File.’
2. Map fields
If you followed our earlier recommendation and named your import column headings the same way they’re named in Pardot, this should be easy; the fields should map automatically. If not, you might have to map any Pardot field that reads “Do not import,” as this indicates Pardot cannot predict the mapping.

While doing this, you can also choose whether any of the (potentially) new values in your source file should overwrite existing data.
If you’re importing prospects that may already be in your database but perhaps includes newer or more relevant information for them (a great example is job title), you can tick the box for ‘overwrite existing data.’

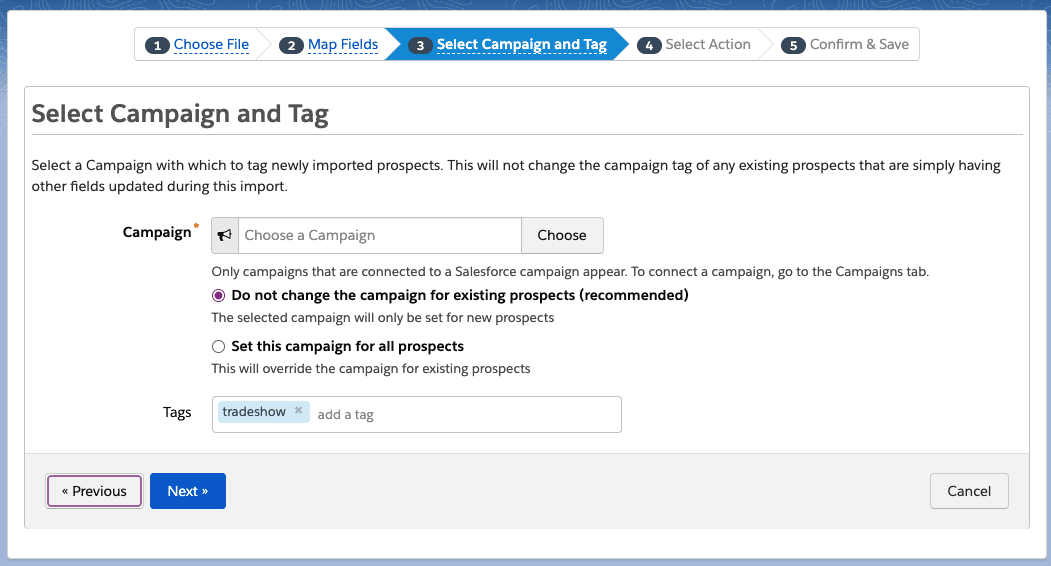
3. Select a campaign and tag
Your next step will be to choose a campaign and—if desired—add tags. Remember that the campaign you choose will only be applied as a source campaign for prospects that are net-new to the system; existing prospects will retain their original source campaign value, as this value is not meant to change.
If you are importing prospects as means to correct bad or incorrectly entered data from a past import, you may elect to use the ‘Set this campaign for all prospects’ but this option should be reserved for prospect data cleanup only; a prospect’s source campaign is not supposed to update with each new interaction, so this option should be used sparingly.
Tags can be incredibly useful in Pardot, but they’re often used correctly or without a company-wide strategy. While we encourage our Pardot customers to use tags, we also advise them to wait until such a strategy is in place.
4. Select actions
Finally, you must decide what to do with your prospects after they’re successfully uploaded. In most cases, you will use the ‘Import prospects and add to list’ option, as this allows you to quickly target them later.
If you have dynamic lists in place that will automatically capture these prospects and therefore don’t require a static list, you can simply select the ‘Import prospects’ option.
Both the ‘Import prospects and remove from list(s)’ and ‘Import prospects and global opt-out’ options should not apply in this scenario, as these are generally utilized to accomplish altogether different goals.
If your organization archives prospects to the recycling bin as part of a database hygiene initiative, consider whether you need to select the ‘Un-delete matching prospects in the recycle bin during this import.’
Most prospects archived to the recycling bin are moved there due to inactivity or a lack of engagement. If any of those prospects have now re-engaged and are included in your new import file, it might make sense to pull them from the recycling bin, thus regenerating their original prospect record and allowing you to target them again.
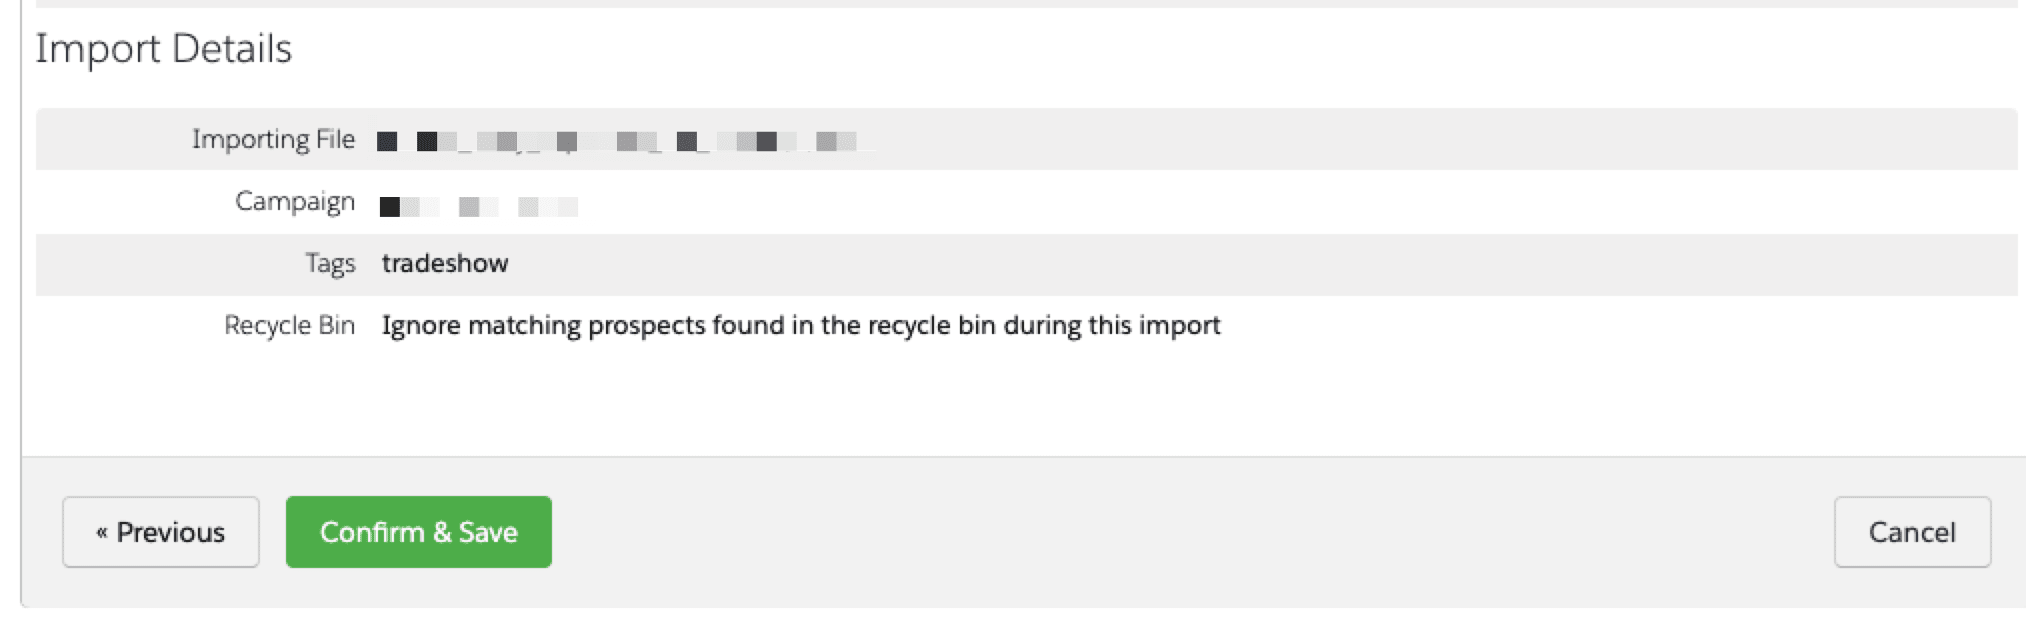
5. Confirm and save
Your last step is to review your selections and—once satisfied—hit the ‘Confirm & Save’ button. Clicking this button begins the upload process.
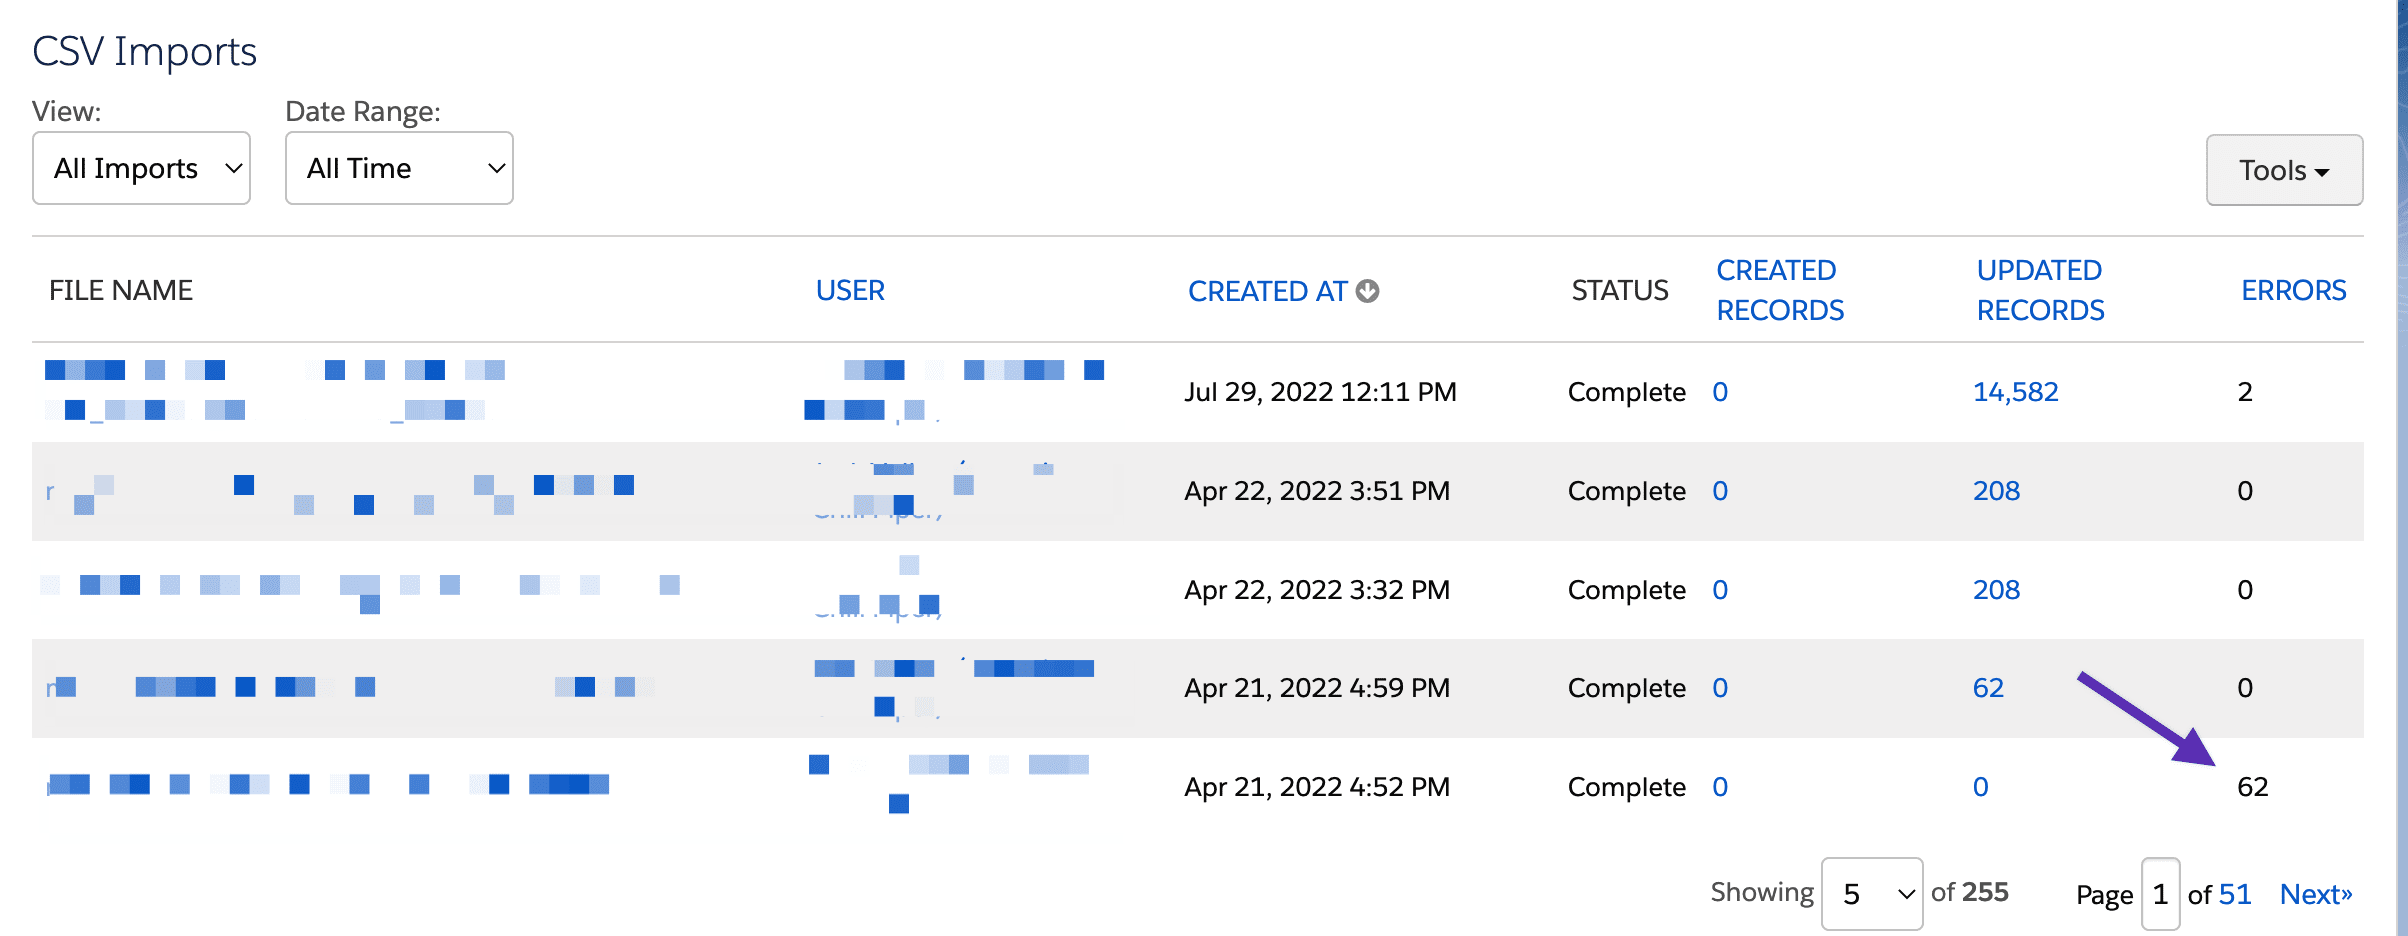
To check the status of your upload, you can navigate back to Pardot Settings > Imports at any time, as this page includes a log of recent imports and their status, as well as the number of any created or updated records.
Review these metrics, as they can serve as a signal that something has gone wrong. For example, if you imported a file of people you expected to be in your database already as existing prospects and found a large number of created records, this may be a sign that duplicate records were generated. You can click on these numbers to see which prospects were created or updated, and continue reviewing to troubleshoot.
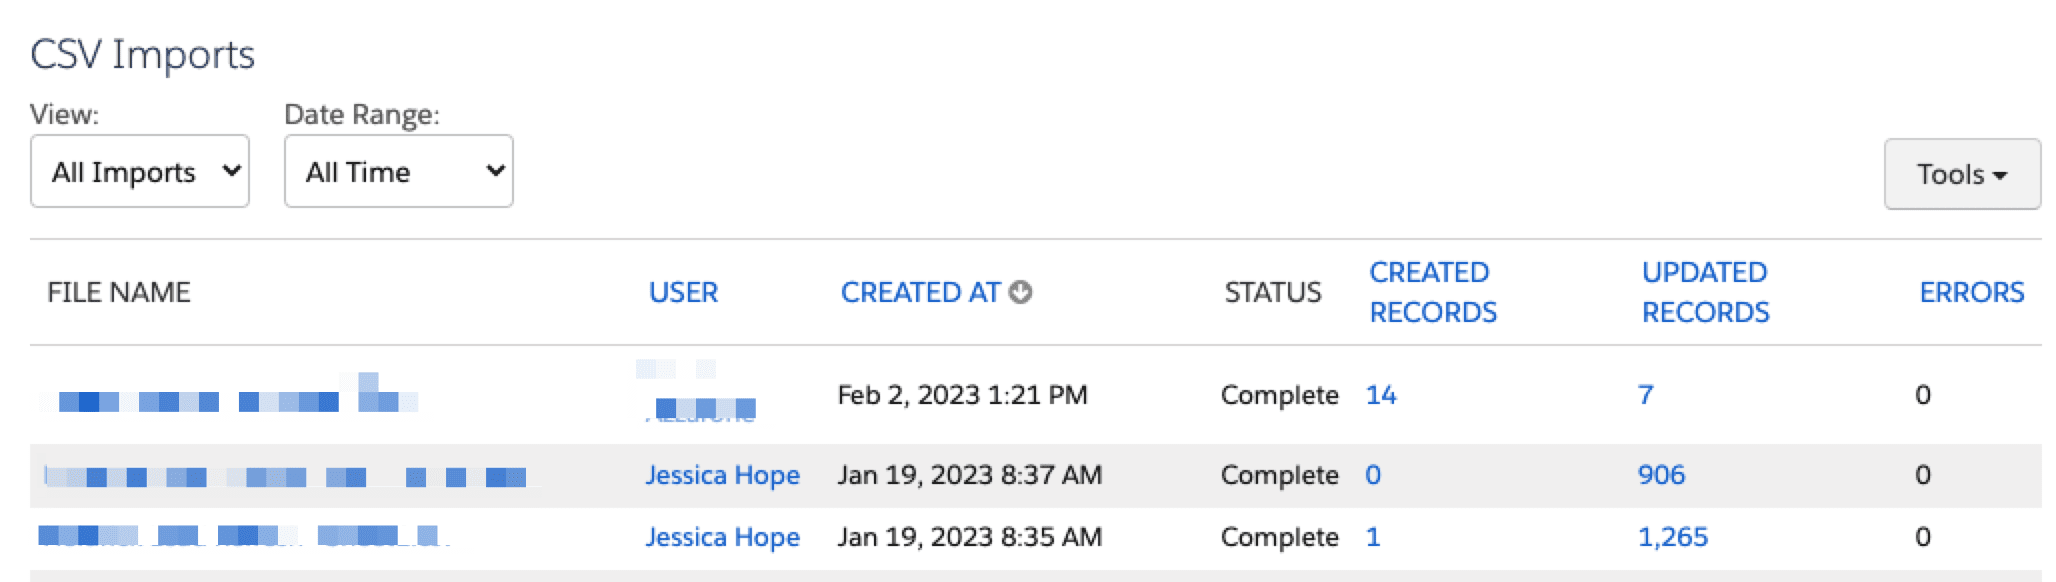
Additionally, there is a column for ‘Errors,’ which includes any leads that were not imported successfully. If you see errors that you’d like to review, click on the import file name, which will provide you with an option for ‘Error File Download.’
Summary
As marketers, it’s difficult to do our job without a foundation of clean prospect data. Without clean data, we cannot confidently segment our database or efficiently target the right people at the right moment.
To make matters worse, invalid field values and the absence of required fields make us susceptible to major problems—the kind that either prevents an engaged lead from being created as a prospect to begin with or the kind that prevents a lead from being handed off to sales once qualified.
To establish a clean, marketable database, we must practice extreme caution when importing prospects. To convert this intractable challenge into a seamless process, organizations should create custom import templates for their team (and see that no import is conducted without them).
Is your organization struggling with imports, sync errors, or bad data? Reach out and let us know; we’ll get you back on the right track.
