


Note: while Pardot has technically been rebranded as Marketing Cloud Account Engagement, we’ve been slow to adopt this new mouthful-of-a-name and have chosen to keep this article old-school with the name ‘Pardot.’
Why we love Pardot automation rules
Automation rules are one of the most useful tools at your disposal in Pardot, as they give you the ability to create repeatable, criteria-based rules that locate matching prospects and apply actions to them. After finding prospects that meet your criteria, automation rules can power tasks like:
- Adding prospects to static lists
- Assigning a profile to a prospect or changing a prospect’s profile criteria
- Correcting prospects’ “bad” data values to the desired format (such as changing a state field value from ‘TX’ to ‘Texas’ en masse)
- Reduce a prospect’s score after periods of inactivity
- Assign qualified prospects to a user, group, or queue
- Create Salesforce tasks for your sales team with details about how and when they should follow up with a prospect
Running automation rules in sequence
In most cases, the order in which your automation rules run doesn’t matter. There are some instances, however, where running automation rules in a particular order or sequence is a necessity. Examples include:
- Automation rules that should only run after another rule (or after several rules, depending on the use case)
- Automation rules that should be prohibited from running if another rule either has/has not yet run
Many Pardot users discover the need to run their rules in sequence by accident, discovering that one rule has overwritten the actions of another or by realizing their intended actions are being applied out of order. If this situation sounds familiar to you, don’t fret—there’s a solution for this.
For our demonstration, we will focus on a simple use case—two automation rules that need to run, one after another—but the same strategy works for more complicated scenarios as well.
Option 1: Tags
- For the automation rule we want to run first, we will not reference a tag as criteria, but we will apply a tag as one of our actions (Apply tags: ‘stage1_complete’).

You can name the tag anything you like
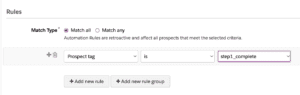
- For the automation rule we want to run second, we will add this tag as criteria for matching the rule (Prospect tag is ‘stage1_complete’).
Option 2: Custom Field
If you go the custom field route, start by deciding on a name, type, and (if applicable) value(s) for the field. We recommend a picklist field with pre-determined values, but you could also leverage a number field and increment the number value with each subsequent rule.
For the custom picklist field solution, follow these steps:
- Create a new custom picklist field with a value for each stage in your automation.
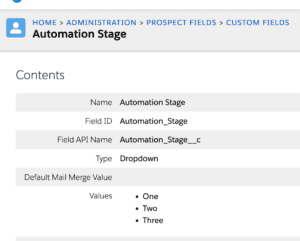
- For the automation rule we want to run first, we will not reference our new field as criteria, but will populate it with a value as our action (Change prospect custom field: Automation Stage to ‘One’).

- For the automation rule we want to run second, we will reference the field as matching criteria (Prospect Custom Field: Automation Stage = One). If our sequence ends with this automation rule, we do not need to add a new action. If you have additional automation rules that need to continue running in order, you will continue to change the custom prospect field value as an action on every rule (such as Change Prospect Field: Automation Stage to ‘Two’), and then reference that new value as criteria in your next automation rule (Prospect Custom Field: Automation Stage = Two).

What next?
As with any Pardot automation, you will need to test your solution thoroughly to ensure the actions are being applied to your prospects in the correct order. As always, you can reach out to us anytime if you’re struggling to make this solution work for you.
